Cloud System

Online Data Storage

Networking

Lan,Fiber Optik,Wireless

Antivirus

Do you have an antivirus installed and running on your system?

Gedgets

Mobile phone technologi

Social media

Trending Media social

Hardware

Ibm,Qnap

Application

Office aplication

virtual machine

In computing, a virtual machine is an emulation of a computer system. Virtual machines are based on computer architectures and provide functionality of a physical computer

Server

RACKMOUNT SERVER

Monday, February 7, 2022

would

Dalam bahasa Inggris, terdapat banyak aturan tata bahasa yang harus diikuti agar dapat menggunakan bahasa tersebut secara baik dan benar. Akan tetapi, tidak jarang peraturan tata bahasa ini membuat para pelajarnya kesulitan dalam memahaminya. Salah satu hal yang sulit untuk dipahami adalah perbedaan dari beberapa kosakata yang terkesan serupa atau sama.

Seperti contohnya perbedaan antara will, would, shall, should, dan could. Kelima kosakata tersebut semuanya merupakan bentuk kata kerja. Akan tetapi, kelimanya tidak bisa digunakan tanpa bantuan kata kerja lainnya. Kata kerja jenis ini disebut juga sebagai verba pembantu yang akan selalu membutuhkan kata kerja utama setelahnya.

Kalau begitu, apa perbedaan dari kelima kata kerja pembantu tersebut? Tentu ada banyak perbedaannya yang akan dijelaskan lebih dalam lagi berikutnya di bawah ini.


Will

Will digunakan untuk mengekspresikan banyak hal. Salah satu jenisnya adalah untuk menunjukkan keinginan, preferensi, pilihan, atau persetujuan. Berikut ini adalah sejumlah contoh penggunaannya sesuai dengan fungsi tersebut.

  • I will work on the task that you gave me (Saya akan mengerjakan tugas yang Anda berikan kepada saya)
  • Will you stop bothering me all the time? (Bisakah Anda berhenti mengganggu saya setiap saat?)
  • I will buy the red dress on the display (Saya akan membeli gaun merah yang dipajang)

Selain itu, will juga digunakan untuk mengekspresikan masa depan. Dalam artian bahwa suatu hal yang akan terjadi di masa depan, bukan saat ini. Berikut ini adalah sejumlah contoh penggunaannya sesuai dengan fungsi tersebut.

  • It will rain tomorrow from early in the morning until the evening (Besok akan hujan dari dini hari hingga malam hari)
  • The announcement will be released soon (Pengumumannya akan dirilis sesaat lagi)
  • I will watch a movie this afternoon (Saya akan menonton film siang hari ini)

Terakhir, will juga digunakan untuk mengekspresikan kapabilitas dan determinasi. Fungsi kapabilitas biasanya hanya digunakan ketika subjeknya merupakan benda mati. Berikut ini adalah sejumlah contoh penggunaannya.

  • This chair will hold up to 90 kilograms (Kursi ini dapat menahan hingga 90 kilogram)
  • I will finish this job until you are satisfied (Saya akan menyelesaikan pekerjaan ini hingga Anda puas)

Would

Would merupakan bentuk masa lampau dari will. Pada dasarnya kata kerja bantu ini sering digunakan dengan rather untuk mengekspresikan preferensi. Berikut ini adalah contoh penggunaannya.

  • I would rather go to the mall than studying today (Saya lebih ingin pergi ke mall daripada belajar hari ini)
  • We would rather be silent about things that we don’t know about (Kami lebih baik diam mengenai hal-hal yang tidak kami ketahui)

Selain itu, would juga digunakan untuk mengekspresikan harapan atau keinginan, kemungkinan, dan menggambarkan hal yang rutin dilakukan. Berikut ini adalah contoh penggunaannya sesuai dengan fungsi-fungsi tersebut.

  • I would like to have new shoes for the prom party (Saya ingin memiliki sepatu baru untuk pesta prom)
  • I would be so happy if you give me a new dress (Saya akan sangat bahagia jika Anda memberikan saya gaun baru)
  • Normally, we would go out jogging every Sunday morning (Normalnya, kita pergi jogging setiap hari Minggu pagi)

Tuesday, January 25, 2022

CREATE TXT RECORD IN DNS ACTIVE DIRECTORY

 Requirements:

- Microsoft Windows Server 2012
- DNS Server has been setup and function properly
- An email address that function properly

 
Step by step create a TXT record inside the zone file:
1. Login to your DNS server as administrator.
2. Launch the DNS Management Console. Click on Server Manager -> DNS. Right Click on your Server name and select DNS Manager
User-added image

3. On DNS Manager window, expand your DNS name. Then expand your Forward Lookup Zones. Over here, you should see your domain name zone. In this example :entrustcertlab.com
User-added image

4. Right click on your domain name and select Other New Records to add a new TXT record.
                Scroll down and select Text (TXT) and click Create Record button.

User-added image

5. Create your record using the reference from the table below:
Format:
Record Name:You must type:
_validation-contactemail
Fully qualified domain name (FQDN):Auto populated
Text :Your designated email address which function properly.
Example: manager@entrustzonelab.com
 
Click Ok to save your new record and Done button to go back to DNS Manager screen.

6. Your TXT record will now show up on your zone records.
At this point the process to add a TXT record for Entrust has been completed.

7. Once this is setup, and the DNS information has been propagated to our Entrust DNS Server (which may take up to 12 hours), you can then use email verification method for the domain in your certificate portal.

Tuesday, November 16, 2021

Changing the Default Remote Desktop (RDP) Port 3389 in Windows

When choosing a non-standard RDP port, please note that it is not recommended to use port 1-1023 (known ports) and dynamic RPC port range 49152-65535.

Let’s try to change the port of Remote Desktop service to 1350. To do it:

  1. Open the Registry Editor and go to the registry key HKEY_LOCAL_MACHINE\System\CurrentControlSet\Control\Terminal Server\WinStations\RDP-Tcp;
  2. Find the DWORD parameter with the name PortNumber. This parameter shows the port, on which the Remote Desktop service is listening;
  3. Change the value of this parameter. I have changed the RDP port to 1350 (Decimal)


Monday, November 15, 2021

Disable TCP port 445 in Windows 7/10 or 11


Use this tried and tested one to disable TCP port 445 in Windows 10 or 11.

Run Command Prompt as Administrator

Type following two commands

sc stop lanmanserver
sc config lanmanserver start=disabled

Reboot system

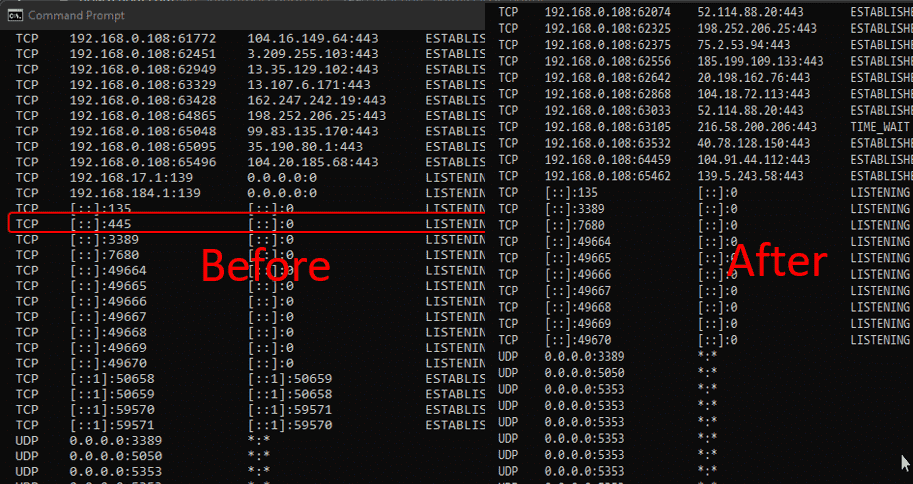
To check whether port 445 is listening by the system or not, if you get an empty result then you successfully blocked it.

netstat -n -a | findstr "LISTENING" | findstr ":445"

Of course, the above method should be used if you don’t require the port at all. Whereas if you require it sometimes, then alternatively, you can use your firewall to safeguard it. To accomplish this, configure them so that no outbound traffic is permitted through the open port. Although all services remain operational, however, accidentally entered malware would be unable to connect to the Internet or other computers.

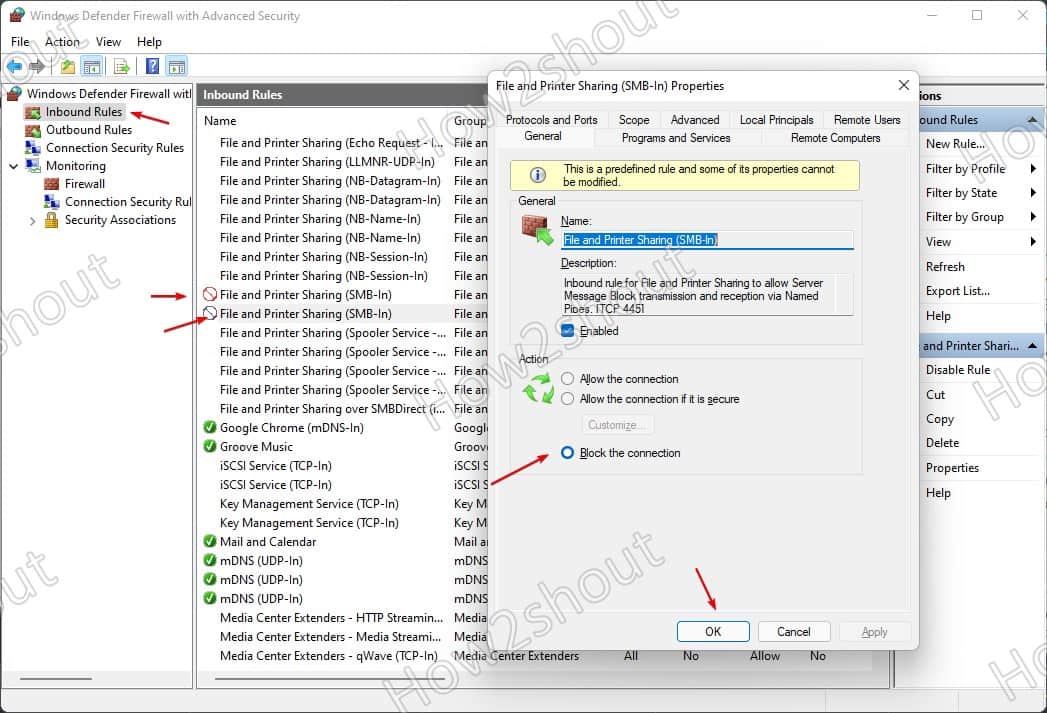
1. Open Windows Defender Firewall with Advanced Security.

2. Select Inbound or Outbound Rules as per your requirement from the left side panel.

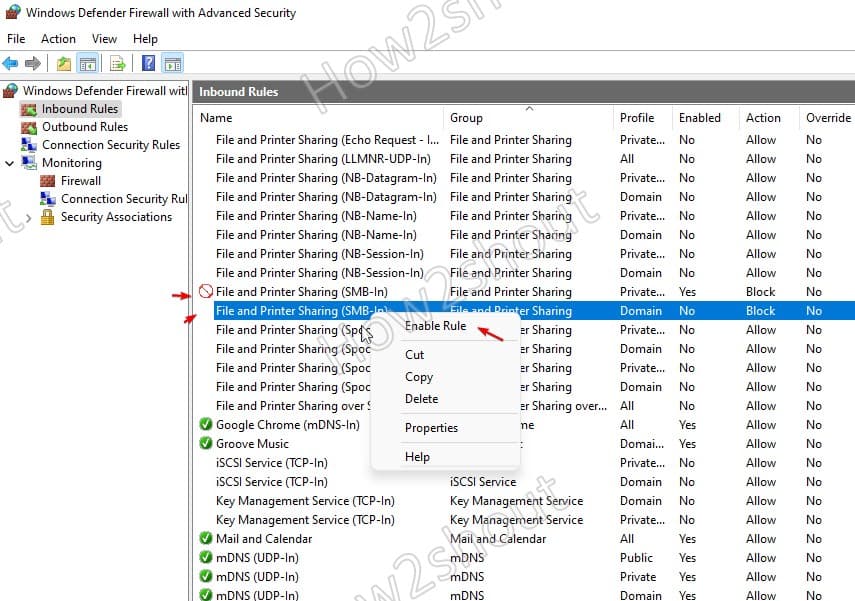
3. Find “File and Printer Sharing (SMB-In)” Private and Domain. Double click on them and then select “Block the connection”.

4. Now, right-click on these two rules and enable them.

Disbale TCP 445 in Windwos 10 or 11 FirewallDisable FIle and Printer Sharing port 445 local


How To Determine whether TCP port 445 is open or closed

After restarting your computer, launch the command prompt and enter ‘netstat -an‘. It will display a list of all open TCP ports. Make certain that ports 445 are not on this list. To confirm this, we can further utilize Avast Internet Security’s Wi-Fi inspector as an SMB vulnerability scanner and discovered that the port had been appropriately closed after following the tutorial above.

Ending Thoughts:

You have successfully limited the SMB server and port 445 in Windows 10 or 11, preventing harmful and ransomware assaults. Most importantly, your computer is no longer accessible via TCP port 445, which means the data on your hard drive is safe from unauthorized access. However, no tutorial can ensure complete security., thus, we also urge that you use a good antivirus program that is not free.

How to disable Port TCP 445 in Windows 10 or 11

There is a widespread notion that an open port is hazardous. This is largely due to a lack of knowledge about how open ports work, why they are open, and which ones should not be open.

To interact across the Internet, open ports are required. An open port, on the other hand, can be problematic if the service listening on it is misconfigured, unpatched, exposed to exploits, or has low network security standards.

Vulnerable ports, such as the one used by the SMB protocol, are the most dangerous open ports, and they are enabled by default in some operating systems.

Monday, December 21, 2020

Cara mengaktifkan windows photo viewer di windows 10

Pertama copy skrip dibawah ini pada notepad, jika sudah save dengan nama bebas tetapi dengan akhiran .reg. (misalnya ‘photoviewer.reg‘)

Windows Registry Editor Version 5.00

[HKEY_CLASSES_ROOT\Applications\photoviewer.dll]

[HKEY_CLASSES_ROOT\Applications\photoviewer.dll\shell]

[HKEY_CLASSES_ROOT\Applications\photoviewer.dll\shell\open]
"MuiVerb"="@photoviewer.dll,-3043"

[HKEY_CLASSES_ROOT\Applications\photoviewer.dll\shell\open\command]
@=hex(2):25,00,53,00,79,00,73,00,74,00,65,00,6d,00,52,00,6f,00,6f,00,74,00,25,\
00,5c,00,53,00,79,00,73,00,74,00,65,00,6d,00,33,00,32,00,5c,00,72,00,75,00,\
6e,00,64,00,6c,00,6c,00,33,00,32,00,2e,00,65,00,78,00,65,00,20,00,22,00,25,\
00,50,00,72,00,6f,00,67,00,72,00,61,00,6d,00,46,00,69,00,6c,00,65,00,73,00,\
25,00,5c,00,57,00,69,00,6e,00,64,00,6f,00,77,00,73,00,20,00,50,00,68,00,6f,\
00,74,00,6f,00,20,00,56,00,69,00,65,00,77,00,65,00,72,00,5c,00,50,00,68,00,\
6f,00,74,00,6f,00,56,00,69,00,65,00,77,00,65,00,72,00,2e,00,64,00,6c,00,6c,\
00,22,00,2c,00,20,00,49,00,6d,00,61,00,67,00,65,00,56,00,69,00,65,00,77,00,\
5f,00,46,00,75,00,6c,00,6c,00,73,00,63,00,72,00,65,00,65,00,6e,00,20,00,25,\
00,31,00,00,00

[HKEY_CLASSES_ROOT\Applications\photoviewer.dll\shell\open\DropTarget]
"Clsid"="{FFE2A43C-56B9-4bf5-9A79-CC6D4285608A}"

[HKEY_CLASSES_ROOT\Applications\photoviewer.dll\shell\print]

[HKEY_CLASSES_ROOT\Applications\photoviewer.dll\shell\print\command]
@=hex(2):25,00,53,00,79,00,73,00,74,00,65,00,6d,00,52,00,6f,00,6f,00,74,00,25,\
00,5c,00,53,00,79,00,73,00,74,00,65,00,6d,00,33,00,32,00,5c,00,72,00,75,00,\
6e,00,64,00,6c,00,6c,00,33,00,32,00,2e,00,65,00,78,00,65,00,20,00,22,00,25,\
00,50,00,72,00,6f,00,67,00,72,00,61,00,6d,00,46,00,69,00,6c,00,65,00,73,00,\
25,00,5c,00,57,00,69,00,6e,00,64,00,6f,00,77,00,73,00,20,00,50,00,68,00,6f,\
00,74,00,6f,00,20,00,56,00,69,00,65,00,77,00,65,00,72,00,5c,00,50,00,68,00,\
6f,00,74,00,6f,00,56,00,69,00,65,00,77,00,65,00,72,00,2e,00,64,00,6c,00,6c,\
00,22,00,2c,00,20,00,49,00,6d,00,61,00,67,00,65,00,56,00,69,00,65,00,77,00,\
5f,00,46,00,75,00,6c,00,6c,00,73,00,63,00,72,00,65,00,65,00,6e,00,20,00,25,\
00,31,00,00,00

[HKEY_CLASSES_ROOT\Applications\photoviewer.dll\shell\print\DropTarget]
"Clsid"="{60fd46de-f830-4894-a628-6fa81bc0190d}"

Setelah itu jalankan file tersebut dengan cara klik 2x, ketika muncul UAC klik saja OK dan ikuti proses hingga selesai.


Dengan begitu, kamu akan mendapatkan kembali pilihan untuk menggunakan Windows Photo Viewer sebagai aplikasi Photo Viewer. Kamu juga dapat memberikan tanda centang pada opsi Always use this app to open .jpg files untuk selalu menggunakan aplikasi Windows Photo Viewer pada ekstensi file tersebut.

Friday, December 18, 2020

Cara cek password WiFi di CDM dan mengetahui password WiFi dari HP


 Cara cek password WiFi di CDM

Command promt atau CDM adalah aplikasi bawaan PC Windows yang bisa dipakai untuk mengetahui password WiFi. Ini langkah-langkahnya:

- Tekan 'Windows + R'.
- Ketik 'CMD' dan klik 'OK' pada kolom pencarian
- Akan muncul kotak berlatar belakang hitam. Ketiklah 'netsh wlan show profiles'
- Tekan 'Enter'
- Tulis seperti berikut: netsh wlan show profiles "Nama WiFi" key=clear

Dengan begitu, detikers bisa mengetahui password pada kolom 'Security Settings' di 'Key Content'.


Cara mengetahui password WiFi dari HP

Ada lagi cara untuk mengetahui password WiFi menggunakan HP. Kendati demikian tidak disarankan karena belum dipastikan keamanannya -- apalagi kalau digunakan untuk mengetahui password WiFi milik tetangga. Kamu bisa menggunakan beberapa aplikasi seperti WiFi Master Key. Caranya sebagai berikut:

- Download aplikasi WiFi Master Key. Bukan dan pilih opsi 'Lakukan Sekarang'
- Tekan tombol 'Nyalakan WiFi' dan pindai 'Hotspot'.
- Nantinya, aplikasi tersebut akan meminta izin akses WiFi. Setelah itu, klik kembali 'Lakukan Sekarang'.
- Muncul daftar koneksi WiFi dengan keterangan 'Aman, Koneksi Gratis, Sambungkan'.
- Pilih 'Sambungkan' dan WiFi akan tersambung.

Cara Convert MBR ke GPT (atau Sebaliknya)

 Pertama kali saya mendapat pesan tersebut, adalah ketika Windows 10 belum lama dirilis. Kala itu, tutorial cara mengubah MBR ke GPT masih sangat terbatas informasinya.

Nah, di sini sekarang saya ingin membagikan informasi cara convert-nya.

Catatan:

Perlu diingat bahwa Anda harus melakukan backup data terlebih dahulu. Karena dari pengalaman saya, data-data yang tersimpan di harddisk akan terhapus nantinya.

Kalau sudah backup, silakan ikuti langkah-langkahnya.

1. Cara Mengubah MBR ke GPT Melalui CMD (Menggunakan Diskpart)

Proses convert MBR ke GPT sebenarnya tidak sulit. Melalui Command Prompt, masalah yang sedang Anda alami ini dapat dengan mudah diatasi.

Command Prompt ini bisa kita akses waktu proses penginstallan Windows.

Untuk caranya sendiri seperti ini:

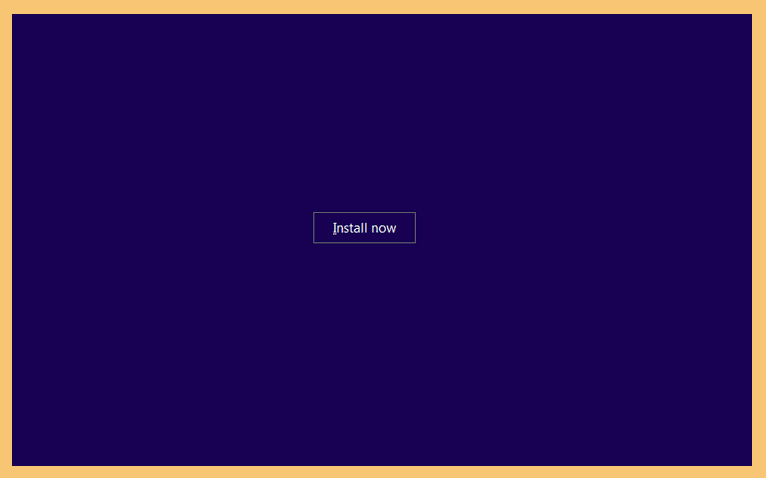
Langkah 1. Silakan masuk terlebih dahulu ke instalasi Windows seperti biasa. Dalam prosesnya, klik Next, lalu klik Install Now.

Install Windows

Catatan:

  • Untuk masuk ke instalasi Windows, Anda bisa memakai DVD
  • Jangan lupa atur BIOS agar boot melalui instalasi

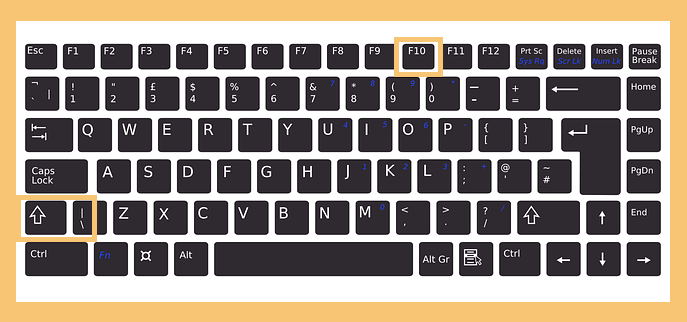
Langkah 2. Klik tombol Shift + F10 untuk membuka CMD.

Buka Command Prompt di Instalasi

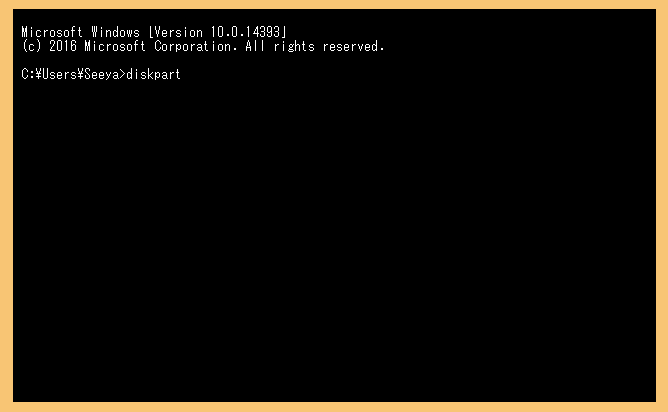
Langkah 3. Setelah CMD dibuka, ketikkan “diskpart” > Kemudian klik Enter.

Perintah Diskpart

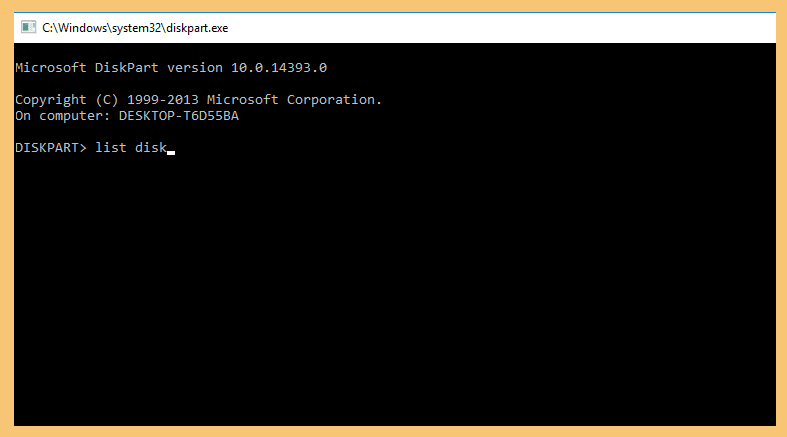
Langkah 4. Selanjutnya ketik lagi “list disk” > lalu tekan Enter.Perintah List Disk

Catatan:

  • List disk ini berfungsi untuk menampilkan harddisk atau SSD yang terpasang di komputer atau laptop Anda
  • Catat disk yang ingin dipakai untuk install ulang.

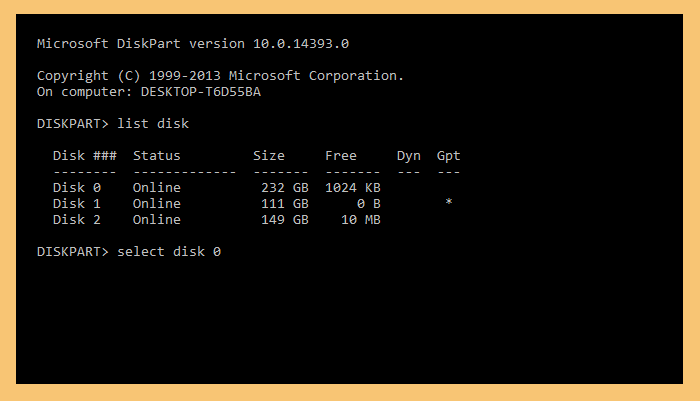
Langkah 5. Kemudian ketik lagi “select disk 0” untuk memilih disk. Atau sesuaikan, misalnya disk 1 atau disk 2.

Pilih Disk di CMD

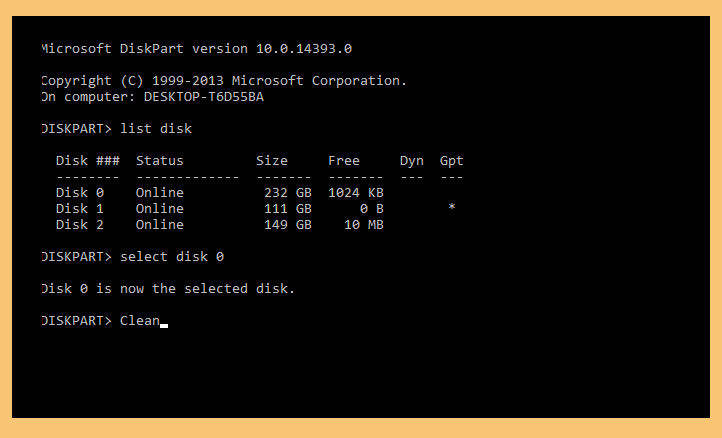
Langkah 6. Ketik “clean” > lalu klik Enter.

Perintah Clean Disk

Catatan:

  • Perintah clean ini akan menghilangkan data. Pastikan sudah backup seperti yang saya jelaskan sebelumnya.

Langkah 7. Terakhir ketik “convert gpt” untuk mengubah format harddisk ke GPT atau “convert mbr” jika ingin sebaliknya.

PerintahFungsi
Convert GPTMengubah disk ke GPT
Convert MBRMengubah disk ke MBR

Langkah 8. Setelah semua langkah tadi dilakukan, sekarang tutup CMD, lalu lanjutkan proses instalasi Windows-nya.