Cloud System

Online Data Storage

Networking

Lan,Fiber Optik,Wireless

Antivirus

Do you have an antivirus installed and running on your system?

Gedgets

Mobile phone technologi

Social media

Trending Media social

Hardware

Ibm,Qnap

Application

Office aplication

virtual machine

In computing, a virtual machine is an emulation of a computer system. Virtual machines are based on computer architectures and provide functionality of a physical computer

Server

RACKMOUNT SERVER

Tuesday, November 28, 2017

Cara Download Video Facebook tanpa Aplikasi Paling Mudah

Cara Download Video & Audio di Facebook dengan Mudah tanpa Aplikasi

Seperti judulnya ya sob ini merupakan cara yang sangat simple praktis yang jelas gratis tanpa app tambahan, berikut tutorial cara unduh video di fb.
a. Langkah pertama silahkan anda login ke akun facebook.
b. Kemudian klik video yang anda ingin download dan menuju ke halaman video (klik kiri > show url dan salin url)
cara download video fb
c. Jika sudah mendapatkan urlnya, tinggal paste ke address bar.
download video facebook
d.Setelah itu sobat ganti url http://www.facebook.com/storygaktauane  dengan  http://m.facebook.com/storygaktauane.   Jadi intinya anda ubah www menjadi m.
e. Kemudian buka url tersebut, selanjutnya putar video tersebut. Selanjutnya arahkan mouse ke dalam video lalu klik kanan dan save as. maka video akan tersimpan di pc anda. Sedangkan untuk hp tinggal putar dan pilih opsi > simpan sd card dan video pun telah tersimpan di sd card hp android anda.

Thursday, November 23, 2017

How to fix NTLDR is missing windows xp

BIOS boot configuration
BIOS boot loader configuration screen

Fix #4: Replace NTLDR and NTDETECT.COM files

Windows XP users can replace the required files for NTLDR to load correctly by using your Windows Installation Disc. The files are named NTLDR and NTDETECT.COM.
Here are the steps to replace these files:
  1. Insert the Windows XP install CD
  2. Restart the computer and boot from the CD
  3. Press any key to boot from the CD
  4. Press R when the Windows Options menu is loaded to access Repair Console
  5. After this step, log into Windows by pressing 1 using the Administrator password
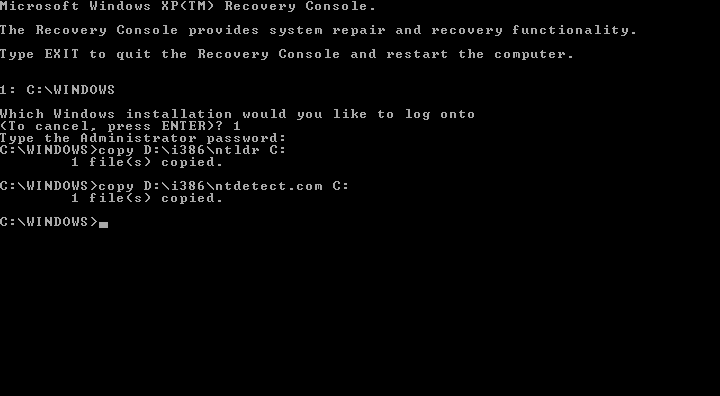
  6. Use the following commands to copy the NTLDR and NTDETECT.COM files from the Windows installation disk to the hard disk:
    copy D:\i386\ntldr C:\
    copy D:\i386\ntdetect.com C:\
    Where D:\ is the install CD’s drive letter and C:\ is the Windows XP partition’s drive letter
  7. Once these files are copied, remove the Windows installation disc from the disc drive
  8. Restart the PC
Here is an example of what the PC’s console output should look like once NTLDR and NTDETECT files are restored correctly:
Replacing ntldr and ntdetect.com files

Fix #5: Rebuild boot.ini file

The next steps are to rebuild the boot.ini file:
  1. Insert the Windows XP install CD
  2. Restart the computer and boot from the CD
  3. Press any key to boot from the CD
  4. Press R when the Windows Options menu is loaded to access Repair Console
  5. After this step, log into Windows by pressing 1 using the Administrator password
  6. Use the following command when Command Prompt appears:
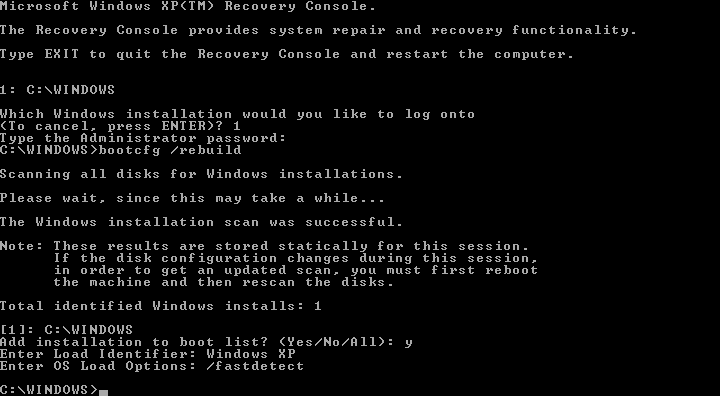
    bootcfg /rebuild
  7. When the systems prompts you about adding an identified Windows installation to the boot list, answer “Y”(Yes)
  8. Enter “Windows XP” as Load Identifier and “/fastdetect” as OS Load Options.
  9. Remove the install CD
  10. Restart your computer
Here is an example of what the PC’s console output should look like once the boot.ini file is properly restored:
Fixing Boot.ini file

Fix #6: Change the bootsector code

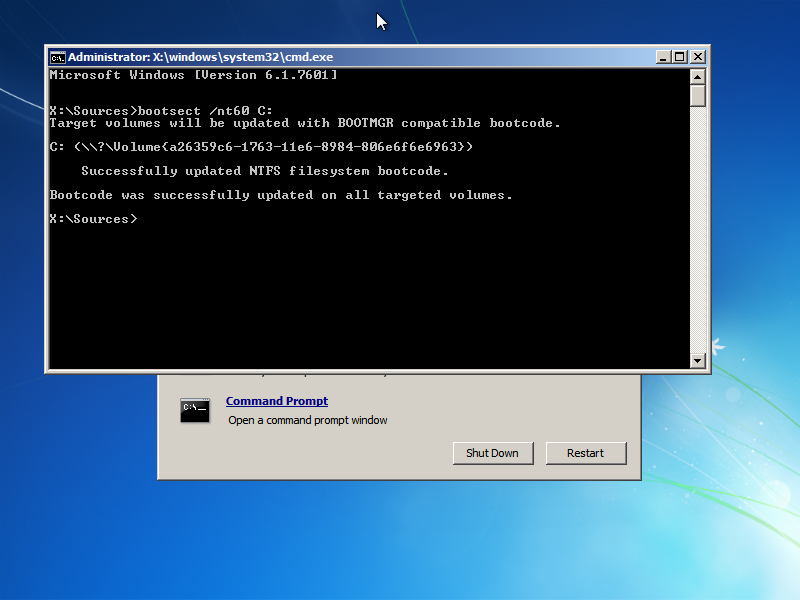
On Windows Vista, Windows 7, Windows 8, Windows 8.1, or Windows 10 this error can be fixed by writing a correct BOOTMGR-related boot sector code to the bootable partition.
Here are the steps to write a correct boot sector:
  1. Insert the Windows Vista(or any newer version) install CD
  2. Restart the computer and boot from the CD
  3. Press any key to boot from the CD
  4. Click on Repair your computer after selecting proper language, time and keyboard input.
  5. Select the Windows installation drive, which is usually C:\, and click Next
  6. Choose Command Prompt when the System Recovery Options box appears
  7. Write the following command and press s Enter afterwards:
    bootcfg /rebuild
  8. If the program finds a Windows installation and asks whether it should add it to the boot list, press Y
  9. Remove the install CD
  10. Restart your computer
Here is an example of what the PC’s console output should look like once a boot sector is written correctly:

Writing a correct bootsect code

Fix #7: Delete excess files from root folder

If the PC’s operating system is an old version of Windows XP or Windows 2000 and it has too many files stored in the root folder, booting into the Repair Console from a Windows Installation disk and deleting the files from there is a possible solution.
Here are the steps to delete files from repair console:
  1. Insert the Windows XP install CD
  2. Restart the computer and boot from the CD
  3. Press any key to boot from the CD
  4. Press R when the Windows Options menu is loaded to access Repair Console
  5. After this step, log into Windows by pressing 1 using the Administrator password
  6. Enter the following command when Command Prompt appears to move to the root folder from the default C:\Windows folder:
    cd ..
  7. Enter the following command to display all files in the root folder
    dir
  8. Then, enter the following command to delete the file:
    del [filename]
    Where [filename] is the name of the file to be deleted
  9. Remove the install CD
  10. Restart the PC
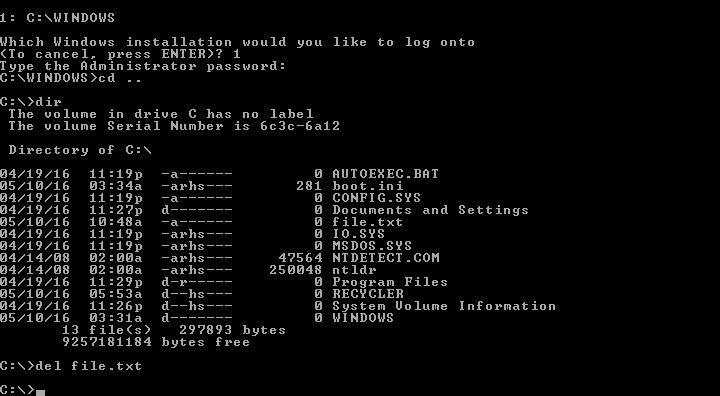
Here is an example of what the PC’s console output should look like after a single file is deleted from the root directory:
Deleting a file from command line
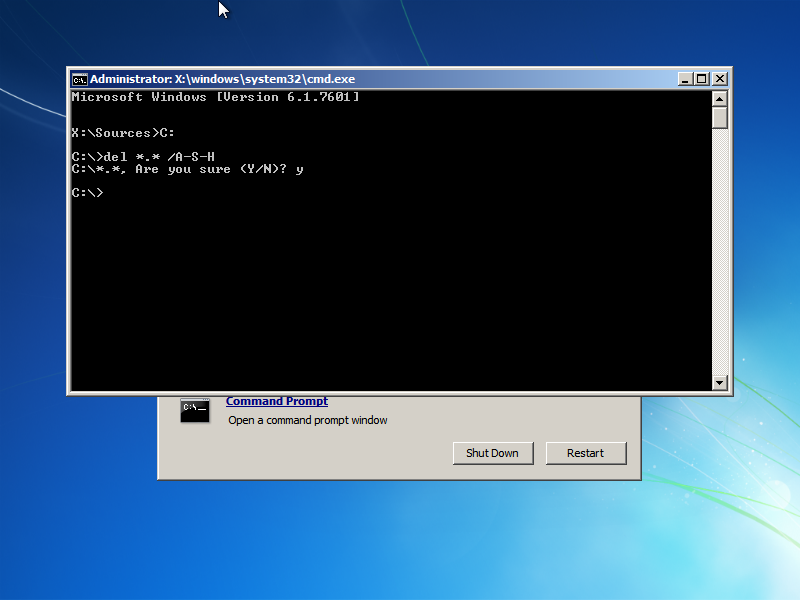
Note that the Windows XP recovery console does not support mass file deletion in the recovery console, so manual file deletion may be a very long and tedious process if there is a lot of them. If that’s the case, it is possible to load from a more modern Windows CD, and use the
del *.* /A-S-H
command to delete all files in the current folder that are not hidden or system files:

Deleting multiple files

Wednesday, November 22, 2017

Free Thunder-Imagine dragons MP3


Neh lagu yang lagi boming  2017

Klik di bawah ini untuk download MP3
https://drive.google.com/file/d/1Fu2cQXmasAqH2Z_pETLheat4cWYUHd13/view?usp=sharing


Just a young gun with a quick fuse
I was uptight, wanna let loose
I was dreaming of bigger things
And wanna leave my own life behind
Not a yes sir, not a follower
Fit the box, fit the mold
Have a seat in the foyer, take a number
I was lightning before the thunder

[Refrain]
Thunder, thunder
Thunder, thun-, thunder
Thun-thun-thunder, thunder, thunder
Thunder, thun-, thunder
Thun-thun-thunder, thunder

[Chorus]
Thunder, feel the thunder
Lightning and the thunder
Thunder, feel the thunder
Lightning and the thunder
Thunder, thunder
Thunder

[Verse 2]
Kids were laughing in my classes
While I was scheming for the masses
Who do you think you are?
Dreaming 'bout being a big star
You say you're basic, you say you're easy
You're always riding in the back seat
Now I'm smiling from the stage while
You were clapping in the nose bleeds

[Refrain]
[Lyrics from: https:/lyrics.az/imagine-dragons/evolve/thunder.html]
Thunder, thunder
Thunder, thun-, thunder
Thun-thun-thunder, thunder, thunder
Thunder, thun-, thunder
Thun-thun-thunder, thunder

[Chorus]
Thunder, feel the thunder
Lightning and the thunder
Thunder, feel the thunder
Lightning and the thunder
Thunder

[Bridge]
Thunder, feel the thunder
Lightning and the thunder, thunder

[Chorus]
Thunder, feel the thunder
Lightning and the thunder, thunder
Thunder, feel the thunder
Lightning and the thunder, thunder
Thunder, feel the thunder
Lightning and the thunder, thunder
Thunder, feel the thunder (feel the)
Lightning and the thunder, thunder

[Refrain]
Thunder, thunder, thunder
Thun-thun-thunder, thunder
Thunder, thunder, thunder
Thun-thun-thunder, thunder
Thunder, thunder, thunder
Thun-thun-thunder, thunder
Thunder, thunder, thunder
Thun-thun-thunder, thunder


Thanks

Friday, November 17, 2017

Tutorial Ganti password Wifi Linksys

                Untuk Akses Login ke Wifi Linksys  ada 2 cara yang pertama bisa menggunakan Laptop dan yang kedua bisa menggunanakan HP Android.

1.  Menggunakan Laptop
Contoh:
a.       Cari Acces Point  Wifi kamar dan koneksikan dengan password yang lama
b.      Jika lupa password bisa menggunakan kabel Jaringan / UTP dan koneksikan ethernet wifi
c.       Jika sudah terhubung dengan wifi misalnya Room3242
d.      Masuk Ke browser bisa menggunakan internet exploler/chrome/mozilla dll
e.      Ketik IP addres  seperti di bawah ini
Setiap kamar IP Addres berbeda beda:
ROOM                          IP ADDRES
Room1112                   10.10.1.112
Room2113                   10.10.2.113
Room3116                   10.10.3.116 dll
Contoh Room3242:                


f.        Isi Nama pengguna dan Password
Nama Pengguna       :admin
Password                    :mm2100
g.       Maka akan masuk sperti gambar di bawah ini

h.      Kemudian Klik  Sub menu Wireless
i.         Kemudian klik Wireless security
j.        Selanjutnya Ganti password Acces point Wifi sesuai yang akan di gunakan,pada Passphrase Klik save Setting,Selesai


2.  Menggunakan Hp Android
Contoh:
a.       Cari AP di setiap kamar dan koneksikan dengan password yang lama
b.      Jika sudah terhubung dengan wifi misalnya Room3242
c.       Masuk Ke browser bisa menggunakan internet exploler/chrome/mozilla dll
d.      Ketik IP addres  seperti di bawah ini

Setiap kamar IP Addres berbeda beda Contoh IP di setiap kamar:
ROOM                          IP ADDRES
Room1112                   10.10.1.112
Room2113                   10.10.2.113
Room3116                   10.10.3.116 dll
Contoh Room3242:
e.      Isi Name dan Password
Name                            :admin
Password                    :mm2100
f.        Maka akan masuk sperti gambar di bawah ini
g.       Kemudian Klik  Sub menu Wireless
h.      Seleanjutnya Ganti password Acces point sesuai yang akan di gunakan pada Passphrase Klik save Setting,Selesai

Solusi Printer dot matrix tidak bisa ngeprint Karena Security Update For microsoft

Printer tidak bisa mencetak, tidak ada respon dan hanya mengeluarkan pesan pending. Padahal kamu sudah menekan tombol (CRTL + P) di keyboard dan printer siap mencetak. Coba metode berikut ini deh, supaya printer bisa mencetak dokumen kembali.

Metode-metode yang akan saya uraikan ini, sudah teruji karena langsung di praktekkan pada laptop/PC dan printer milik pribadi yang terkoneksi internet, disini saya menggunakan printer Epson LQ-310

Cara Mengatasi Printer dot matrik Epson LQ-310Tidak Bisa Mencetak  


Ada beberapa metode yang bisa kamu lakukan supaya printer kembali bisa mencetak dokumen. Namun, ini hanya bisa berfungsi untuk memperbaiki masalah pada software saja, bukan untuk hardware, sebab printer tidak bisa mencetak bukan disebabkan oleh rusaknya printer, melainkan dari kesalahan pengunaan dan pengaturan laptop/PC Anda.

Langsung saja neh sobat saya mau membagikan tip untuk masalah saya tanggal 17 november 2017 kemaren ,saya di pusingkan dengan masalah client saya tidak bisa ngprint dot matrik pada window 7 padahal biasanya kalo sudah di pindahin port ,ganti kabel,direstore point,bisa lagi,eh ternyata eh ternyata dari Microsot ada automatic update Security Update For microsoft dan printer tersebut tidak suport dengan update tsb.


  • Cara pertama buka menu windows update


  •  kedua Klik view update history


  • Ketiga

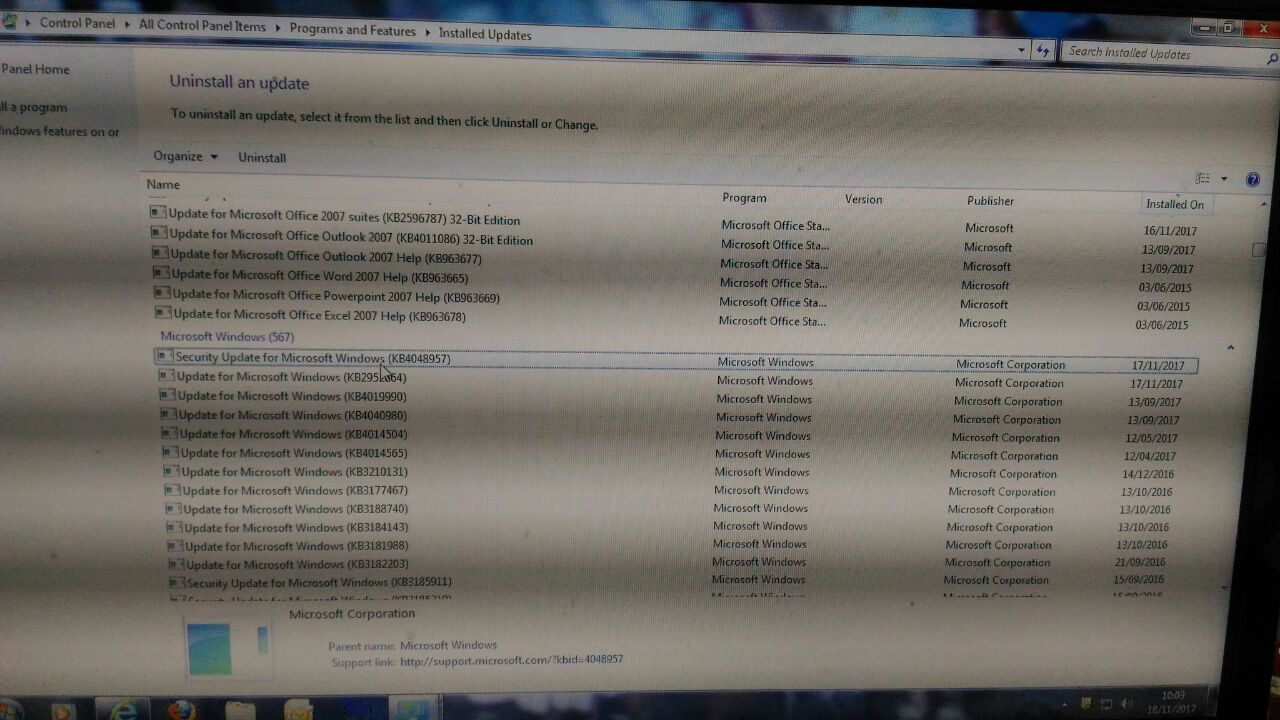
Uninstal Automatic Update windows yaitu
1. Security Update For microsoft Windows (KB4048957)
2. Update For microsoft Widows (KB2952664)


Setelah uninstal keduanya dan minta restart  silahkan Test Print coba pasti berhasil


Dan jangan lupa setalah itu Hide update keduanya 


-Pertama masuk menu window update lagi dan clik seperti yang di kursor di bawah ini


-kedua langsung beri cheklist yang di uninstal sebelumnya klik kanan kemudian hide update


SELESESAI

Tuesday, November 14, 2017

Perintah dalam cmd

Image result for cmd
Berikut adalah perintah-perintah pada Command Prompt yang berhubungan dengan jaringan komputer.
Untuk melakukan perintah-perintah tersebut Anda harus masuk keCommand Prompt ( Klik Start ->Run ->Ketik CMD ).
1. ipconfig /all
Menampilkan informasi konfigurasi koneksi, misalnya Host Name, Primary DNS
Type, Ethernet Adapter LAN.
2. ipconfig /flushdns
Menghapus DNS Cache
3. ipconfig /release
“Menghapus” semua koneksi IP Address.
4. ipconfig /renew
Membuat IP Address baru untuk adapter tertentu.
5. ipconfig /displaydns
Menampilkan DNS Cache.
6. ipconfig /registerdns
Melakukan refresh DNS dan meregister kembali koneksi DNS.
7. ipconfig /showclassid
Menampilkan informasi DHCP Class.
8. ipconfig /setclassid
Mengubah DHCP Class ID
9. control netconnections
Menampilkan Network Connection.
10. nslookup
Mengetahui alamat ip address dari nama domain yang di tuliskan
11. netstat
Menampilkan informasi koneksi TCP/IP yang sedang aktif.
12. route
Menampilkan local route.
13. hostname
Menampilkan nama komputer.
14. ping
Contoh: ping news.putunik.com
Melakukan test koneksi ke situs news.putunik.com.
Semakin sedikit % loss-nya maka semakin baik koneksinya.
15. tracert
Menampilkan informasi IP Address route.
Hack Wireless Via CMD Windows
ini hanya untuk pengguna windows. Kalau linux saya belum terlalu tahu.
Buka RUN dari menu start, atau shortcut menggunakan WINDOWS + R.
Abis itu ketik CMD
Akan muncul tampulan seperti ini
Ketik: “ipconfig /all” tanpa tanda petik. Perintah ini berfungsi untuk menampilkan informasi seputar koneksi dimana anda berada sekarang.
Hasilnya akan seperti ini. Segala macam informasi bisa anda peroleh. Mulai dari IP Address anda, Phisycal Address komputer Anda, DNS wireless dan lain-lain. Kalau yang di saya seperti ini.
Dalam bagian ini, teman-teman bakal melihat ada yang namanya DNS Servers. Bagian itu yang akan kita ambil dalam proses masak-memasak kali ini. Lhoo??
Apa berikutnya…
Setelah penulisan perintah di atas dan hasilnya muncul, akan muncul lagi fasilitas untuk memasukkan perintah seperti yang di awal.
Kini perintahnya beda lagi. Perintahnya begini: “ping -l 500 10.0.1.2 -t”.
10.0.1.2 itu berasal dari DNS Server yang tertera di atas.
Tekan enter, dan biarkan perintahnya berjalan dengan sendirinya.


 TRIK HACK MENGGUNAKAN CMD

Telnet adalah salah satu fasilitas yang sering digunkan untuk meromote computer dalam suatu jaringan  melalaui underdos (CMD),
Tapi terkadang perintah telnet sering kali gagal terkoneksi  Koq bisa ya?,
Tentu aja bisa dong , alasannya apakah konfigurasi telnetnya sudah diaktifkan atau belum , kalau belum wajar aja perintah telnat engggak bisa di gunakan .
Sebenernya perintah telnet hamper mirip dengan perintah Remote desktop , cuma kalau  telnet lebih seru alias enggak ketahuan sewaktu kita melakukan pengambil alihan ke suatu computer ,kalau telnet udah bisa dilakukan maka secara otomatis kita biasa mengendalikan computer tersebut sesuai dengan keinginan kita , Misalnya :
Mematikan kompter yang tidak kita kehendaki, atau sekedar iseng maling data yang fungsi telnetnya udah aktif .
Dari pada pusing pusing medingan kita praktek yuk……………..

Langkah awal coba kita cek konfigurasi telnet di computer kita , caranya :
Tekan tobol windows +R ( klik Run – ktikan CMD terus klik OK)  sampai muncul tampilan Dos :

Untuk mengecek apakah fungsi telnet udah bisa dilakukan atau belum sebaiknya kita chek dulu computer apa aja yang lagi jalan , sekarang ketikin perintah :

Pada tampilan diatas saya coba dengan beberapa perintah
-net view , mengecek jaringan (host) mana aja yang lagi aktif .disitu ada beberapa host sedang terkoneksi dengan computer saya yaitu PC-03, SERVER sedangkan saya sendiri menggunkan computerSERVER-2003
Kemudian saya coba ping ke PC -03 , ternyata dihasilkan IP 192.168.16.8 ,
Salnjutnya kita bias mencoba mengechek port mana saja yang bisa kita susupi ke computer tersebut misalnya saya mau chek computer SERVER yang lain

Perhatikan pada Bagian Foreign Address! Disitu kita dapatkan sebuah Port yang terbuka dengan port 139, kalau sudah seperti itu coba anda lakukan telnet (spasi) IP tujuan(spasi)noPort:
telnet 192.168.16.66 139
jika benar maka akan menghasilkan seperti berikut ini:

Kira-kira begitu;lah hasilnya , tugas anda sekarang adalah cari apa fungsi dari port 139, seracing di google ya?……he…he..  ,
Ok Mungkin itulah caranya mengecek Port yang terbuka pada Host tertentu. Nah kita kembali keperintah telnet untuk meremot computer lain yang terhubung dalan computer kita .sekarang kita coba telnet PC03, caranya sama kayak tadi
Telnet 192.168.16.8 (enter), kalau sukses maka akan keluar tampilan seperti ini:
C:\Documents and Settings\Administrator>net view
Server Name            Remark
\\PC03                 lpkid
\\SERVER
\\SERVER-2003
The command completed successfully.
C:\Documents and Settings\Administrator>ping 192.168.2.22
Pinging 192.168.2.22 with 32 bytes of data:
Request timed ot.
Reply from 192.168.2.22: bytes=32 time<1ms TTL=128
Request timed out.
Ping statistics for 192.168.2.22:
Packets: Sent = 4, Received = 2, Lost = 2 (50% loss),
Approximate round trip times in milli-seconds:
Minimum = 0ms, Maximum = 0ms, Average = 0ms
C:\Documents and Settings\Administrator>telnet 192.168.2.22
Welcome to Microsoft Telnet Client
Escape Character is ‘CTRL+]’
You are about to send your password information to a remote computer in Internet
zone. This might not be safe. Do you want to send anyway(y/n): n (masukan n, kemudian enter)
Welcome to Microsoft Telnet Service
login: RIZKYKHARISMANEGARI
password:******

Welcome to Microsoft Telnet Server.

C:\Documents and Settings\admin>
Untuk memastikan benarkah kita ada dalam Komputer PC03 , kita coba lakukan pemeriksaan IP :

Welcome to Microsoft Telnet Server.

C:\Documents and Settings\admin>ipconfig
Windows IP Configuration
Ethernet adapter Local Area Connection 2:
Connection-specific DNS Suffix  . :
IP Address. . . . . . . . . . . . : 192.168.2.22
Subnet Mask . . . . . . . . . . . : 255.255.255.0
Default Gateway . . . . . . . . . :
C:\Documents and Settings\admin>
yUp emang kita udah berhasil masuk ke computer tersebut,
(catatan untuk bisamasuk service telnet harus di aktifkan terlebih dahulu , yang kemudian Client/admin mana saja yang boleh melakukan telnet ..Ok!)
Nah sekarang anda bisa ngapain aja di computer yang sekarang sedang anda control missal saya mau merestart:
Kalau belum tahu perintah ketikain aja perintah kayak gini
C:\Documents and Settings\admin>shutdown/?
Usage: shutdown [-i | -l | -s | -r | -a] [-f] [-m \\computername] [-t xx] [-c "c
No args                 Display this message (same as -?)
-i                      Display GUI interface, must be the first option
-l                      Log off (cannot be used with -m option)
-s                      Shutdown the computer
-r                      Shutdown and restart the computer
-a                      Abort a system shutdown
-m \\computername       Remote computer to shutdown/restart/abort
-t xx                   Set timeout for shutdown to xx seconds
-c "comment"            Shutdown comment (maximum of 127 characters)
-f                      Forces running applications to close without war
ning
-d [u][p]:xx:yy         The reason code for the shutdown
u is the user code
p is a planned shutdown code
xx is the major reason code (positive integer le
ss than 256)
yy is the minor reason code (positive integer le
ss than 65536)
C:\Documents and Settings\admin>shutdown -r -t 15
The machine is locked and can not be shut down without the force option.
C:\Documents and Settings\admin>shutdown -r -f -t 15
C:\Documents and Settings\admin>
Untuk perintah -r -f -t saya yakin udah pada tahu semua , Nah itu telnet untuk di computer yang menggunakan OS windows gimana kalau kita coba nyusup kedalm Os linux melalui Os windows? Mungkin ada sedikit perbedaan , antara linux dan windows ,dalam Linux Ada istilah SSH yang berfungsi untuk melakukan remote desktop, dan juga telnet, kedua-duanya memiliki fungsi yang sama yaitu pengambil alihan computer lain dan yang berhak tentunya sang admin(root).
Dalam percobaan kali ini saya memiliki client yang terhubung ke server linux dengan IP: 192.168.2.254kebetulan saya tahu password tiap client , sementara adminnya saya tidak tahu  he…he.., Sekarang kita coba masuk kedalam Linux melalui Cmd pada windows lets Go……!!
Microsoft Windows [Version 5.2.3790]
(C) Copyright 1985-2003 Microsoft Corp.
C:\Documents and Settings\Administrator>telnet 192.168.2.254
Connecting To 192.168.16.254…Could not open connection to the host, on port 23
: Connect failed
C:\Documents and Settings\Administrator>ftp o  192.168.2.254
Transfers files to and from a computer running an FTP server service
(sometimes called a daemon). Ftp can be used interactively.
FTP [-v] [-d] [-i] [-n] [-g] [-s:filename] [-a] [-A] [-x:sendbuffer] [-r:recvbuf
fer] [-b:asyncbuffers] [-w:windowsize] [host]
-v              Suppresses display of remote server responses.
-n              Suppresses auto-login upon initial connection.
-i              Turns off interactive prompting during multiple file
transfers.
-d              Enables debugging.
-g              Disables filename globbing (see GLOB command).
-s:filename     Specifies a text file containing FTP commands; the
commands will automatically run after FTP starts.
-a              Use any local interface when binding data connection.
-A              login as anonymous.
-x:send sockbuf Overrides the default SO_SNDBUF size of 8192.
-r:recv sockbuf Overrides the default SO_RCVBUF size of 8192.
-b:async count  Overrides the default async count of 3
-w:buffer size  Overrides the default transfer buffer size of 65535.
host            Specifies the host name or IP address of the remote
host to connect to.
Notes:
- mget and mput commands take y/n/q for yes/no/quit.
- Use Control-C to abort commands.
C:\Documents and Settings\Administrator>ftp -v 192.168.16.254
User (192.168.16.254:(none)): roads-01
Password:******
ftp> dir
total 39108
lrwxrwxrwx  1 roads-01 roads-01       39 Dec 11 20:00 .DCOPserver_roads.net_:0 -
> /home/roads-01/.DCOPserver_roads.net__0
-rw-r–r–  1 roads-01 roads-01       58 Dec 11 20:00 .DCOPserver_roads.net__0
-rw——-  1 roads-01 roads-01    41556 Dec 30 17:44 .ICEauthority
drwx——  6 roads-01 roads-01     4096 Dec  4 19:21 .Trash
-rw——-  1 roads-01 roads-01      330 Dec 30 17:44 .Xauthority
drwx——  3 roads-01 roads-01     4096 Feb 11  2008 .adobe
-rw-r–r–  1 roads-01 roads-01      192 May 24  2007 .asoundrc
-rw-r–r–  1 roads-01 roads-01      305 Dec 19 10:30 .asoundrc.asoundconf
drwxr-xr-x  4 roads-01 roads-01     4096 Mar 17  2008 .avg7
-rw——-  1 roads-01 roads-01     7661 Dec 19 09:43 .bash_history
ftp> ls -l
total 38360
dr-xr-xr-x 25 roads-01 roads-01    12288 Feb 24  2008 31-12-20_2020
drwxr-xr-x  4 roads-01 roads-01     4096 Nov 10 21:35 Desktop
-rw-r—–  1 roads-01 roads-01   328405 Dec  4 19:20 Foto Lembar 3.5
-rw-r—–  1 roads-01 roads-01   964590 Jun 28  2007 Kwitansi.jpeg
-rw-r–r–  1 roads-01 roads-01    18231 Sep 19 16:51 LATIHAN 1.ods
-rw-r—–  1 roads-01 roads-01   471882 Nov 27 08:20 Rohmat
-rw-r–r–  1 roads-01 roads-01    14885 Nov 13  2007 ULANGAN 1.odt
-rw-r–r–  1 roads-01 roads-01    16717 Aug 19 16:20 WAONE.ods
Pertama saya coba menggunkan telnet ternyata servicenya tidak diaktifkan kemudian saya coba masuk , menggunkan PORT 22, ternyata SSH tidak bisa di handle lewat windows. Kemudian saya coba masuk Melalui Port Ftp server dan ternyata saya bisa masuk dengan
Usser               : roads-01
Password        :******
Untuk mengecek kebanarannya lalu saya coba memberikan perintah dir, dan ls -l
Hasilnya kita bisa lihat seperti diatas gimana….Nah mungkin itulah salah satu cara masuk ke console linux dan linux yang saya pake Distro Ubuntu, Kalau yang lain saya belum coba he…he..,   kalau udah begitu kita bisa Mengkcopy file yang terdapat di computer linux ke komputer windows dengan bantuan Code ASCII , silahkan coba ya!….Ok dech selamat mencoba….aja Bro J,
Oh ya saya melupakan salah satu yang penting, Apa itu Konfigurasi telnet , oke dech saya kasih tahu ; Caranya cukup mudah cukup Klik Start – Control Panel – Admistartion Tool -  Service -Kemudian  Cari Telnet , setelah ketemu klik Kanan-Properties- StartUp type (pilih Automatic ) lalu Pilih tabStart untuk mengaktifkan layanan telnet ini.
Setelah di aktifkan kemudian tentukan client mana saja yang bisa melakukan telnet caranya:
Buat User terlebih dahulu terus , setelah selesai Kemudian Klik start-Mycomputer-klik kanan – Properties- remote  - Select User -Dan Pilih Add -Avandce-Find Now , pilih user yang anda kehendaki kalau udah tinggal klik Ok